This post assumes a basic knowledge of Scala and SBT set up
Before we start, we need to know what exactly SBT is.
SBT stands for Scala Build Tool, as explained by the docs here, the next logical question should be “ What is a Build Tool ? “. If you did, great because I once asked the same question. A Build Tool as explained here is basically software that helps you simplify and automate most tasks that you use in your development process, from managing dependencies (other libraries you need) to tasks such as creating a JAR, pushing to docker e.t.c. Some really popular build tools include Maven, NPM e.t.c
SBT is pretty wide, and it cannot be covered it in a post. We won’t go too deep into the inner mechanics of SBT, because it’s quite complicated for beginners. We will just look at how to use it to make life easier for us :), So we’ll try to deal only with the basics and make it relatable.
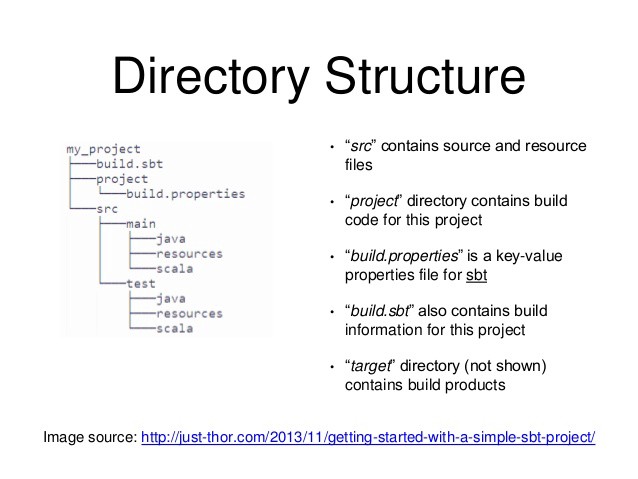
One thing that’s very common and particular about build tools is that they define a pretty strict directory structure for them to work properly, as there are a lot of internal processes performed by them that expect your project to be structured in a certain way. SBT is not an exception as seen here.
To make this tutorial more relatable and show some basic capabilities, We will use SBT to create a library that depends on another library for validating phone numbers (dependency management), create a JAR file and also push the JAR file of our word dominating library to the world for others to use.
Sadly, we won’t actually write any Scala code, but we will assume that the actual code exists in the src/main/scala/ directory of our project.
We start by creating our library as a project called phony in “/tmp/phony”, which makes our projects base directory phony.
Below, we see that the minimal and regular directory structure SBT requires of us is a configuration file (*.sbt) as well as the src directory.

Where my project in our case is phony, the main directory needed is the src directory which contains your source code. The project directory is not entirely necessary at this point.
The default configuration file needed by SBT that more or less defines your project is any file in the base directory with a .sbt extension but conventionally called build.sbt.
N.B If all you have is the build.sbt without the src directory, and you run sbt, SBT will create a workspace in that directory for you (i.e create a src directory).
We’ve done something really spectacular with just these 5 lines in SBT and I will go by them one after the other.
Before we begin, you may notice the symbol :=This for simplicity is to establish a key-value relationship between the left operand which can be a setting for your project and the right operand which is the value for that setting.
- name: A setting is used to tell SBT what name you will like to give this project (phony in our case)
- version: Another setting that tells SBT what version of your project you are currently working on.
- scalaVersion: basically tells SBT what scala version of your project you want to use to run this codebase. If the version does not exist on your local computer, it will download it for you. [Cool right :)]
- organization: A setting that tells SBT the name of your organization, conventionally your major domain name in reverse order. You may be wondering how these are important to writing our world-dominating library, don’t worry, we will get to that soon.
- libraryDependencies: This tells SBT what external library to fetch and add or put in your classpath (hence the
+=), for you to use in your own project (Google’s phone number validator in this case.)
Let’s imagine you have written your scala code as explained here, then you now want to compile, run and also test your code
SBT helps us do all of these with these basic commands when run from the base directory of your project.
We’ve done a pretty minimal setup, Now let’s see how SBT can help us to run our code and even push our code to some repository for others to use. We will look into some basic commands provided by SBT.
sbt clean: Cleans your project, removing files produced by a previous build
sbt compile: Compiles your code …. duurh … :)
sbt run: Runs detected main class (If there are multiple, It’ll outline the main classes for you to select the actual main class to run )
sbt test: Runs tests
Here is a very good post that talks about the basic sbt commands
At this stage, we have actually used SBT to clean, compile, run and test our world-dominating library, now we are ready to publish our code to the world for the puny humans to use.
Just a little detour, there is some magical software called Apache Ivy, installed along with sbt that manages downloaded libraries on your local machine, let us just say it’s a repository manager that knows how to arrange and store your libraries so that your projects, no matter where they exist on your machine can use those libraries. This please see this post on dependency management. It’s way deeper than this, but this should suffice for now.
I highly encourage you to read that post before moving on as it will help you understand how libraries are fetched and arranged.
Typically, to do this, we would have had to compile our code, create a JAR file out of it configure it in our repository manager, manually add it to the classpath of any project we want to use, but with SBT, with some very minor configurations, we can solve all of that.
There are external repositories that exist and as at the time of this writing, Scala uses Maven2 by default, you can also set up your own Repository remotely or locally, but in our case, we will use the local Apache Ivy repository manager. All libraries are stored in the .ivy2 directory in your home folder.
The first thing we need is to create a JAR from our source code to be exported, to do that, all we need to do is:
sbt package: What this will do is package your code into a JAR file [ Yeah …that simple …… ].
sbt publishLocal: This will take the JAR file that was created by SBT (can be found somewhere in the target folder) and push it for you to our local repository manager (ivy2).
Actually, sbt publishLocal can do the work of both packaging and publishing for you :)
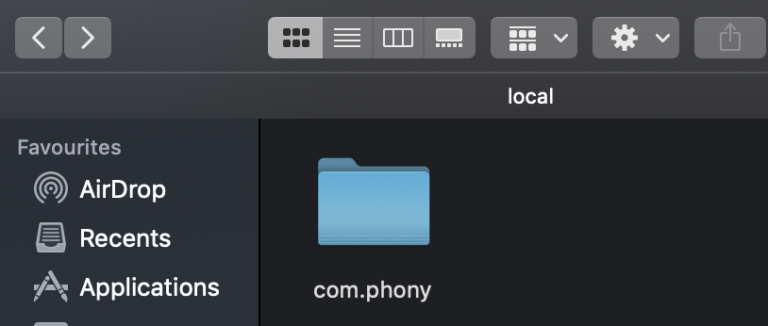
Now, how do we know that our library exists in our local repository. If we go to {user.home}/.ivy2/local we should see this folder

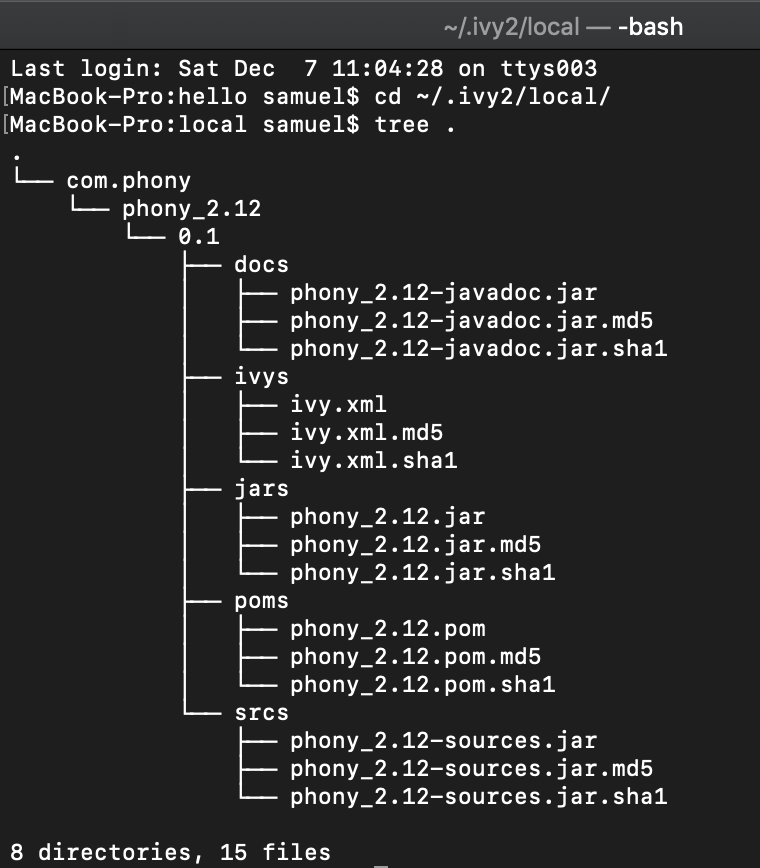
For brevity, with the tree command, we can see all that it contains.

SBT with a simple command has generated not just a jar file, but poms as well
If you’re attentive enough, you’ll notice something about the directory structure of how our library is arranged, It’s {organization}/{name}_{scalaVersion}/{version}, All of which where defined in our build.sbt file.
You see how those key — value pairs defined in sbt are essential when publishing the library.
Apache Ivy arranges libraries by their organization, so libraries that have the same organization name in their build.sbt file will be arranged in the same folder.
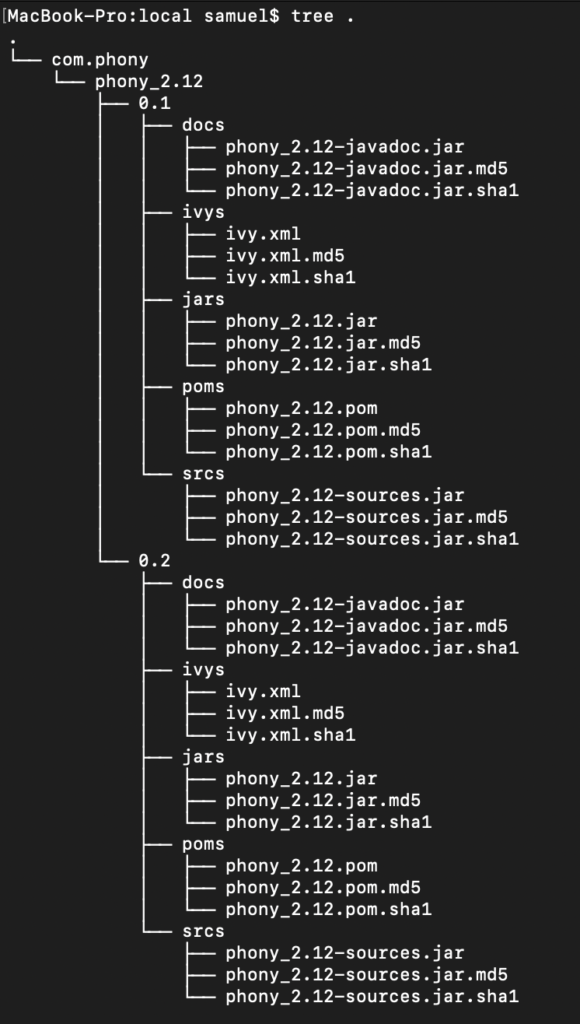
Let’s do something else and assume we make some changes and bump the version in build.sbt to 0.2, run sbt publishLocal again and then see what happens in our organization directory.

You see that the second version of our library 0.2 has been published to our local repository, and because they belong to the same scalaVersion they are under the same folder.
If we were to use a different Scala version in the build.sbt, say
2.13.XX, a new directory phony_2.13 will be created under our organization, to signify that it used a different Scala version.
So with SBT, we can see how easy it is to release libraries. If you were to release the library to an external repository. It’s also this simple. Some extra configuration has to be supplied to SBT like the password, username, and destination of the repository to resolve amongst others.
USING OUR LIBRARY IN ANOTHER PROJECT
Now let’s talk about importing our world-dominating library into another project, all we have to do is add it as a library dependency just as we did for in the build.sbt of the actual library. The format for adding an external library is:
libraryDependencies += "groupID" % "artifactID" % revision
where
groupID is simply the organization, artifactId is the name_scalaVersion, while the revisionis theversion as all defined in our build.sbt. See this post for another angle. In our case, that will be
libraryDependencies += "com.phony" % "phony_2.12" % 0.2
which will fetch the second version of our library (0.2) and add it as a dependency of the new project we are working on provided the library is in the local repository.
It’s also worth noting that with SBT, you can define your build process. If there are some extra steps you think should be included, It’s completely possible to add it your build.sbt and when SBT runs, it will also include those steps.
FINAL THOUGHTS
SBT also has its own interactive shell that is run by just calling sbt, commands like run, clean and test can then be directly entered into the shell.
All the code we wrote in SBT is actually pure SCALA code, It didn’t seem evident when I started out with SBT but after some time, you realize that all the weird symbols are actually just methods that define some sort of class that SBT uses to actually do its work :)
— — — — — — — — — — — — — — — — — — — — — — — — — — — — -
In the next post, we will take a deeper look into other SBT commands, how it can be used to pass arguments to the Scala compiler as well as the JVM, and also how we can also define our own SBT commands similar to clean, compile e.t.c.